#HTML Nunjucks Templates
Explore tagged Tumblr posts
Visit Tumblr Blog
Explore Tumblr blogs with no restrictions, modern design and the best experience.
Last Seen Tumblr Blogs


Fun Fact
In 2020, 44% of users from Denmark used Tumblr daily.
Photo

Introkap | Download | Theme Good Games 2018 Portal Store HTML Gaming Template News Download Good Games 2018 Portal / Store HTML Gaming Template News Download Good Games is a perfectly crafted template for gaming, store and magazine websites. This template is suitable for any game portal, startup, news portal, eSport or just your personal website or blog. GoodGames... https://introkap.com/wordpress/good-games-2018-portal-store-html-gaming-template-news-download.html #İntro #İntroOpeners #AfterEffect #3dlogo #Wordpress2018 #Blog #Script #FreePremiumBlogger #MotionGraphic #FreeAfterEffectsTemplate #ResponsiveCreative #MultiPurposeWordPressTheme #VideohiveProjects #FreeSoundEffect #Elements2018 #motionstockfootage #VideoMotion #Infographic #Transitions #Interface2018 #StockFootage2018 #JoomlaExtensions #PrestashopModule #NulledScripts #AudiojungleMusic #BlogThemes #WordPressPlugin2018 #WordPressFastThemes #HTMLFast #Backgrounds2018 #FreePremiumBloggerWordpressTemplates #Video #PremierPro #sunyVegas #FinalCut #AdobeAnimate #Joomla #Linux #Plugins #VideoEditing #DMCA #BuddyPress #Creativeİntro #eCommerce #Entertainment #Addons #Plugins Pack #SocialNetworking #CMS #NewsMagazine #WooCommerce #ThemePack2018 #MusicEvents #Blogger #Gallery2018 (shortcodes), + Webpack, 404 page, A lot of unique, Blog Pages, Bootstrap 4 Based, Clan Wars and Tournaments, Clean and, Developers Ready, eCommerce Pages, elements, Forum Pages, Gallery, Good Games, Good Games 2018, Good Games 2018 wordpress theme, Good Games theme download, Google Maps, HTML Nunjucks Templates, JS ES6 Modules, MailChimp integration, mobile navigation 100% Responsive, News Page, professional code Coming Soon Page, Real swipe, Retina Ready, SCSS, Working AJAX contact form, Working Instagram feed, Working Twitter feed
#(shortcodes)#+ Webpack#404 page#A lot of unique#Blog Pages#Bootstrap 4 Based#Clan Wars and Tournaments#Clean and#Developers Ready#eCommerce Pages#elements#Forum Pages#Gallery#Good Games#Good Games 2018#Good Games 2018 wordpress theme#Good Games theme download#Google Maps#HTML Nunjucks Templates#JS ES6 Modules#MailChimp integration#mobile navigation 100% Responsive#News Page#professional code Coming Soon Page#Real swipe#Retina Ready#SCSS#Working AJAX contact form#Working Instagram feed#Working Twitter feed
0 notes
Text
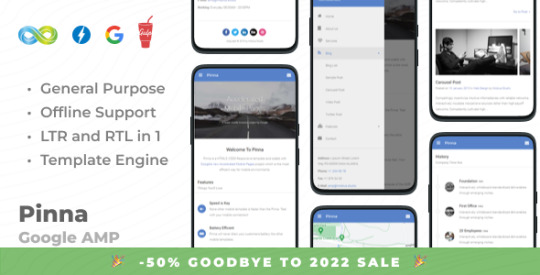
Pinna - Google AMP Template
Pinna – Google AMP Template
LIVE PREVIEWBUY FOR $9 Summary Pinna is an HTML5, CSS3, Responsive, AMP template. Of course template is totally AMP valid. GULP is the builder for distribution or production packages. NUNJUCKS template engine is used for better, logical pages. Gulp task renders Nunjucks pages into HTML files. You don’t have to use those, there are also pre-built HTML files to work with. Left to right and right…
View On WordPress
0 notes
Text
Apptober Day 17

Wohoo the Wallberry clock submodule is finished! The time zone stuff wasn’t actually terrible to write. Probably because I wasn’t doing anything super complicated, but I feel lucky all the same!
A Wild Design Pattern Appears!
If you’ve ever worked with a project using the MVC (Model View Controller) design pattern you’ll feel right at home writing a MagicMirror2 module. If you haven’t played with MVC before have no worries because the idea is gloriously simple, it just means our code is organized into three neat components:
The Model (AKA Data Model)
The Data Model contains the code that describes the data our module will be using.
For a more complex module you might have entire data object classes that live in their own files (like the authors of this weather module did). However, my clock module here is so simple that it’s not even worth separating my little time and city data objects from the Controller code.
The Controller
The Controller is what implements the lion’s share of our app logic. It takes the Data Model objects, does whatever calculations need to be done on them, then hands the results off to the View to be displayed.
In our case the main module file (“WB-clock.js”, also displayed in the first screenshot up above) is our Controller. You can see how it’s responsible for assembling the city and timezone data objects and returning them for our View’s template:

The View
The View is the code is responsible for constructing and displaying what the user sees.
MM2 includes the Nunjucks templating engine, so my View code is going to take the form of .njk template file. You’ll recognize the syntax immediately if you’ve ever written templates for a Django web server or used Jinja templates, but for the most part it just looks like fancy HTML:

Those {{ variable }} things are where the templating engine will put the data from the Controller, then the whole thing will be displayed to the user like you saw in the first screen shot!
Why Bother With MVC?
MVC is such a popular design pattern (seriously, once you learn it you’ll see it EVERYWHERE in web development) because it helps us write much, MUCH more maintainable code.
Having our Controller separate from our View means that we can change our app’s logic WITHOUT having to touch the code that’s responsible for displaying it. This becomes especially useful when you’re working with a team of people; now your interface designer can write the CSS and template code at the same time another dev writes the logic code that will provide the data.
Also, just to give you nightmares, imagine being the person who comes in to re-theme or maintain a project where all of your View and Controller code is mixed together and all of the app’s HTML is constructed through a spaghetti bowl of various javascript if-statements and functions:

Yeah that’s not fun. MVC FTW.
Also I want to say I’m not dunking on the person who had to write the code above (for MM2′s default clock.js), it was written before MM2 had Nunjucks support and you gotta do what you gotta do wildwildwest.mp3.
Up Next
I can’t decide if I’m going to work on the weather module next or clean things up a bit and port my CSS and font assets into my theme module. We’ll see :D
#apptober#javascript#programming#nodejs#magicmirror2#wallberry#long post#geez sorry guys i guess i'm really passionate about MVC
8 notes
·
View notes
Text
10 Best Free And Open Source Static Site Generators To Build Your Website

Static site generators are excellent for getting your website up and running quickly. Check out these top SSGs. Do you need an open-source static website generator? Your search for solutions ends here.
A website can be static or dynamic. Dynamic websites usually run on CMS (Content Management Systems) like WordPress. To provide information to a user, a content management system utilizing a database populates a website.
In static sites, a server serves static web pages to clients without making any changes. Every page of a website is an HTML file. This method is straightforward to use. This is how websites were built in the early days of the web. The homepage of a static website is a file. This article showcases 10 open-source and free static site generators available for building a website.
1. Jekyll
A static site generator, Jekyll is a pioneer in the field. Tom Preston-Werner, the co-founder of Github, released it in 2008. Written in Ruby, it creates static websites using JSON, YAML, CSV, and TSV files.
By using Jekyll, users can host their websites in their GitHub repositories, it is the best free website builder.
2. Hugo
Hugo is known for its speed when creating websites. In addition, it has a powerful theme creation system. The content-type options are extensive and it's available on multiple OS platforms.
3. Publii
Publii is a free, open-source desktop-based app. You don't have to use the site's servers since it runs locally. Therefore, you can work on your site offline.
Once you have access to your server, upload the changes and it will save them. Many kinds of uploads are available, including HTTP/HTTPS servers, Amazon S3, Netlify, SFTP, and Google Cloud.
Publii allows you to create a personal blog, portfolio, or corporate website. With this app, you can create, modify, and run unlimited websites instantly. There are no databases or credentials to remember.
4. Nuxt
Nuxt is a web framework for building static sites that are based on Vue. You can host your static Website maker free on Azure Static Web Apps as it follows the open-source model. Nuxt supports server-side rendering. Thus, it is an excellent candidate to replace traditional Vue single-page applications (SPAs)
5. Gridsome
Another open-source SSG is Gridsome. It uses Vue.js and uses GraphQL to function. Jamstack is a framework that enables it to create fast, high-performance, secure, low-cost, and better-experienced websites on the fly.
With it, you can work offline even without an internet connection, using data cached during your last interaction with the app.
6. Hexo
Node. js-powered Hexo is an easy, fast, and powerful blog platform. With it, you can use most Octopress plugins and GitHub Flavored Markdown features. A powerful API makes it possible to extend the system in any direction.
There are a variety of plugins that support most template engines, such as EJS, Pug, Nunjucks, and many others. Additionally, it integrates smoothly with NPM (Node Package Manager) packages such as Babel, Post CSS, and Less/Sass.
7. Docusaurus
Facebook developed Docusaurus as an open-source static site generator 2021. The app uses React and Markdown. Docusaurus lets you write static HTML files from Markdown docs and blog posts.
Thus, you can focus on documenting your project and save time. MDX lets you embed JSX components into Markdown. Docsaurus also comes with pre-configured localizers that can translate your documents into over 70 languages.
8. VuePress
Evan You, the creator of Vue.js, built the minimalist VuePress using Vue. Vue projects need it for technical documentation. The project uses Vue, Vue Router, and Webpack. With Markdown, VuePress is a simple and free WordPress blogging platform.
9. Eleventy
Eleventy (11ty) is a simplified Open-Source Security System. It was designed to serve as an alternative to Jekyll for JavaScript. Eleventy can operate without configuration files or commands since it has zero-config. As a result, your first project is less daunting to build. It will take you less time to get your website live.
Eleventy templates use independent engines. It will make migration easier if you decide to use something else later. Furthermore, it supports several template languages. Using each one separately or together is possible.
10. Pelican
Pelican is a Python-based open-source SSG. The tool enables you to create content using reStructuredText or Markdown markup, easily host static output, and customize themes via Jinja templates. In addition, it supports atom/RSS feeds, code format highlighting, plugins, and a plugin repository, and it is multi-lingual.
Visit to Read More (Source):- https://www.itscybertech.com/2021/09/10-best-free-and-open-source-static.html
#Website maker free#website generator#static site generator 2021#Free website for small business#Create a Static Website#best free website builder
1 note
·
View note
Text
Time for Client-side development!

In my eighth blog article today we are going to have a look at introduction to Client-side development.
As discussed in the fourth blog article,Distributed systems use client-side elements.Also we now know that client-side elements are
•Views – what users see (mainly GUIs) •Controllers – contain event handlers for the Views •Client-model – Business logic and data

We will be focusing on tools and technologies used to develop Client-side designs.
1.View development Browser-based clients’ Views has two main elements HTML CSS

HTML is used in making content while CSS is used in formatting.
*HTML-Hyper Text Markup Language This describes the structure of web pages using markup.
HTML elements are represented by tags. The following elements to perform it's functionality.
•Structural elements header, footer, nav, aside, article
•Text elements Tags are used to label content of the following. Headings – <h1> to <h6> Paragraph – <p> Line break - <br>
• Images Using <img> tag images can be inserted to web pages.
•Hyperlinks <hr> can be used to embed web links into web pages.
Other than these basic elements,HTML uses elements like •Data representational elements Data structure like Lists and tables are used for nesting purposes.
•Form elements These contain radio buttons,check boxes,buttons and so on.
*CSS-Cascading Style Sheets CSS are used to design web pages.

Things like the following can be done using CSS.. , Aligning Font and text editing. Color and background controls. Positioning.
CSS has three main selectors known, •Element selector • ID selector •Class selector
Also advanced selectors include pseudo classes and pseudo elements.
CSS can be used as, 1. Inline CSS 2. Internal CSS sheets 3. External CSS sheets
* Inline CSS Are used to include designs of a single element inside the code itself.
* Internal CSS sheets Used if a single page has to be included with a unique style.
* External CSS sheets Are coded as separate CSS file and used whenever needed.
*Media Query

This is a CSS technique introduced in CSS3. It uses @media rule when including a block of CSS properties. This happens only if a certain condition is true.
To learn more on HTML and CSS these links can be used..
https://www.w3schools.com/htmL/html_intro.asp
https://www.w3schools.com/css/css_howto.asp
Frameworks and libraries and plugins
View development uses frameworks,libraries and plugins too..
Some of the sophisticated tools are, jQuery,jQuery UI,Angular,React,Bootstrap,NodeJS and etc.

1.jQuery jQuery is a JavaScript Library.But this works as a framework too.
2.Angular This framework is operated by the Google.Front end applications are developed by this.
3.React Another JS library which became very popular within a short period of time.User interfaces can be built using this.
4.Bootstrap Out of frameworks this is very popular as it supports HTML, CSS, and JavaScript.It is free to download. The dimensions of a web page viewed in a computer can be adjusted to be viewed by a mobile phone as appropriate by reducing the screen size.
More information can be found in W3Schools website,
https://www.w3schools.com/bootstrap/
https://www.w3schools.com/jquery/
*Templates

Templates can maintain consistency across pages in the web site or applications. Most templates can be edited easily and they are free to be downloaded. Templates can be found for both server and client sides.

•Client-side (JS-based) template engines NUNJUCKS, PUG, MUSTACHE.JS, HANDLEBARS
•Server-side template engines Twig, jTwig, Thymeleaf, Apache Velocity
Like we discussed in the beginning of the article,browser-based clients has the two main components as,controllers and client and models.
And the above discussed frameworks,libraries and templates are used to develop these components.
In client-side component development tools main features like •DOM processing (dynamic content generation, change, removal) •Data processing •Data persistence •Session management (cookies) •Communicating (with server components)
* Generic client-side features •Form/data validation When data is entered to forms they must be validated importantly. JS can be used for this basically.
•Dynamic content generating/updating Once data is entered it must be generated and updated as wanted with user levels if needed.
•Some business logic (client-model) Business logic is used when front end and back end coding is done.
•Delta-Communication (AJAX, SSE, WS) Tools like AJAX is used to update web pages without reloading, requesting or receiving or sending data from a server
•Data formatting/preparation Data should be able to format as required and prepared for final use.
References
[1] Wikipedia.com. “ HTML ”. [Accessed: April 26, 2019].
[2]W3Schools.com. “CSS”. [Accessed: April 26 , 2019].
[3]W3Schools.com. “Bootstrap“. [Accessed: April 26 , 2019].
0 notes
Text
Introduction to Client-Side Development
Introduction to client-side elements
Distributed systems use client-side elements, so that users can interact with.
The client-side elements include,
Views – what user see
Controller – contain event handlers for the views
Client-model – business logic and data
View Development
Browser-based clients’ Views comprises two main elements
Content – HTML
Formatting – CSS
HTML
HTML Elements
o Structural elements – header, footer, nav, aside
o Text elements – headings, paragraphs, line breaks
o Images
o Hyperlinks
o Data representational elements – Lists, Tables
o Form elements – Input, Radio buttons, Check boxes, Buttons
CSS (Cascading Style Sheets)
Used to decorate or format content.
Advantages:
Reduce HTML formatting tags
Easy modification
Faster loading
Save lot of work and time
Three main selectors of CSS
Element Selector
- Selects elements based on the name
ID Selector
- Uses the id attribute of HTML element to select a specific element
Class Selector
- Selects elements with a specific class attribute

Advanced selectors
Pseudo Classes Pseudo Elements
:link first-letter
:visited first-line
:hover first-child
Specificity:
Specificity is, which browser decide which css property values are the most relevant to an element and, therefore, will be applied.
Specificity is a weight that is applied to a given css declaration determined by the number of each selector type in the matching selector.
The following list of selector types increases by specificity
1. Type selector and pseudo elements
2. Class selectors, attribute selectors and pseudo classes
3. ID selectors
CSS Advanced features
Web fonts - Allow you to use custom fonts other than device fonts
Colors, gradients, backgrounds
Transformations and animations
Media
Media queries
Media queries can be used to check many things.
- Width and height of the viewport
- Width and height of the device
- Orientation
- Resolution
Can be used as
o Inline CSS
o Internal CSS sheets
o External CSS sheets
Inline CSS
Advantages:
Inline CSS can be used for many purposes, some of which include:
Testing: Many web designers use Inline CSS when they begin working on new projects, this is because its easier to scroll up in the source, rather than change the source file. Some also using it to debug their pages, if they encounter a problem which is not so easily fixed. This can be done in combination with the Important rule of CSS.
Quick-fixes: There are times where you would just apply a direct fix in your HTML source, using the style attribute, but you would usually move the fix to the relevant files when you are either able, or got the time.
Smaller Websites: The website such as Blogs where there are only limited number of pages, using of Inline CSS helps users and service provider.
Lower the HTTP Requests: The major benefit of using Inline CSS is lower HTTP Requests which means the website loads faster than External CSS.
Disadvantages
Inline CSS some of the disadvantages of which includes:
Overriding: Because they are the most specific in the cascade, they can over-ride things you didn’t intend them to.
Every Element: Inline styles must be applied to every element you want them on. So if you want all your paragraphs to have the font family “Arial” you have to add an inline style to each <p> tag in your document. This adds both maintenance work for the designer and download time for the reader.
Pseudo-elements: It’s impossible to style pseudo-elements and classes with inline styles. For example, with external and internal style sheets, you can style the visited, hover, active, and link color of an anchor tag. But with an inline style all you can style is the link itself, because that’s what the style attribute is attached to.
Internal CSS
Advantages
Since the Internal CSS have more preference over Inline CSS. There are numerous advantages of which some of important are an under:
Cache Problem: Internal styles will be read by all browsers unless they are hacked to hide from certain ones. This removes the ability to use media=all or @import to hide styles from old, crotchety browsers like IE4 and NN4.
Pseudo-elements: It’s impossible to style pseudo-elements and classes with inline styles. With Internal style sheets, you can style the visited, hover, active, and link color of an anchor tag.
One style of same element: Internal styles need not be applied to every element. So if you want all your paragraphs to have the font family “Arial” you have to add an Inline style <p> tag in Internal Style document.
No additional downloads: No additional downloads necessary to receive style information or we have less HTTP Request
Disadvantages
Multiple Documents: This method can’t be used, if you want to use it on multiple web pages.
Slow Page Loading: As there are less HTTP Request but by using the Internal CSS the page load slow as compared to Inline and External CSS.
Large File Size: While using the Internal CSS the page size increases but it helps only to Designers while working offline but when the website goes online it consumers much time as compared to offline.
External CSS
Advantages
There are many advantages for using external CSS and some of are:
Full Control of page structure: CSS allows you to display your web page according to W3C HTML standards without making any compromise with the actual look of the page.
Reduced file-size: By including the styling of the text in a separate file, you can dramatically decrease the file-size of your pages. Also, the content-to-code ratio is far greater than with simple HTML pages, thus making the page structure easier to read for both the programmer and the spiders.
Less load time: Today, when Google has included the Loading time in his algorithm, its become more important to look into the page loading time and another benefit of having low file-size pages translates into reduced bandwidth costs.
Higher page ranking: In the SEO, it is very important to use external CSS. In SEO, the content is the King and not the amount of code on a page. Search engines spider will be able to index your pages much faster, as the important information can be placed higher in the HTML document. Also, the amount of relevant content will be greater than the amount of code on a page. The search engine will not have to look too far in your code to find the real content. You will be actually serving it to the spiders “on a platter”.
There are many frameworks/libraries/plugins to support view development
o They dynamically generate HTML+CSS code
o In server and/or client side
o May have JS-based advanced interactive features
Other tools
jQuery - A JS library, but can be seen a framework too
jQuery UI - Focus on GUI development
Bootstrap - To rapidly design and develop responsive web pages and templates
Angular - A JS framework/platform to build frontend applications
React – A JavaScript library for building user interfaces
Templates are used to maintain consistency across pages in the web site/application.
Template engines are available for both server and client sides
Client-side (JS-based) template engines - NUNJUCKS, PUG, MUSTACHE.JS, HANDLEBARS
Server-side template engines - Twig, jTwig, Thymeleaf, Apache Velocity
Plug-ins
Plug-ins are mainly to add widgets to the Views
Component Development
Browser-based clients’ components comprises two main aspects
Controllers
Client-model
The components of browser-based clients are developed using JS/JS-based frameworks, libraries, and plugins.
Main features of client-side development tools
o DOM processing (dynamic content generation, change, removal)
o Data processing
o Data persistence
o Session management
o Communication
JS6 (JavaScript6)
Also called ECMAScript6
New features
JavaScript let
- The let statement allows you to declare a variable with block scope.
JavaScript const
- The const statement allows you to declare a constant
Exponentiation (**)
- The exponentiation operator (**) raises the first operand to the power of the second operand.
Default parameter values
- Default parameter values allows function parameters to have default values.
Array.find()
- The find() method returns the value of the first array element that passes a test function.
- function takes 3 arguments:
The item value
The item index
The array itself
Array.findIndex()
- The findIndex() method returns the index of the first array element that passes a test function.
- function takes 3 arguments:
The item value
The item index
The array itself
Web workers
This API is meant to be invoked by web application to spawn background workers to execute scripts which run in parallel to UI page
Web storage / Session storage
This is for persistent data storage of key-value pair data in Web clients.
GeoLocation
Identify the device location
File API
Handle the local files
Image capturing
Use local hardware
Top JS frameworks/ libraries
jQuery - Basic and simple. Cover the complexity of JS and provides cross-browser compatibility.
React - powers Facebook, Ease of Learning, DOM Binding, Reusable Components, Backward Compatibility
Angular - Support for Progressive Web Applications, Build Optimizer, Universal State Transfer API and DOM, Data Binding and MVVM
Vue – light weight, with a much-needed speed and accuracy
Generic client-side features
Form/ data validation
Dynamic content generating/updating
Some business logic
Delta communication
References
https://www.w3schools.com/css/css_syntax.asp
https://developer.mozilla.org/en-US/docs/Web/CSS/Specificity
https://www.w3schools.com/cssref/css3_pr_mediaquery.asp
https://vineetgupta22.wordpress.com/2011/07/09/inline-vs-internal-vs-external-css/
https://www.w3schools.com/js/js_es6.asp
0 notes
Text
Eleventy is an alternative to Jekyll
Hom many simple static site generators do you know? We found a new one! Eleventy is an alternative to Jekyll. Transforms a directory of templates (of varying types) into HTML. Ready to try? Eleventy is a simpler static site generator. Works with HTML, Markdown, Liquid, Nunjucks, Handlebars, M...
#API documentation tool#blog engine#documentation tools#eleventy#github#Handlebars#html#javascript#JavaScript Template Literals#Jekyll#Liquid#markdown#Nunjucks#Open source#static site generator#templates#web development#web server
0 notes
Text
Review of the Best Template Builders
Nowadays you can hire frontend developers or even full stack ones, and they will create a website for your needs. In order to make it faster, but still create a high-quality product, they will use Pug template engine or the one that fits not only JavaScript, but other languages as well, like Mustache, for example. But we surely jump into the topic too fast.
In case you are not familiar with the term, template builders or engines, how they are called sometimes – are a special type of software, which provides developers with half-ready solutions for writing a cleaner code. They are created in order to make life of frontend and backend developers easier. They allow to write code pieces much faster, without extra time-consuming movements. There are many of them for different programming languages, allowing to work with a variety of frameworks, which is convenient due to the fact, that preferences of developers usually tend to vary, while they are making their choice of framework to code with. Template builders have many advantages and are surely worth to be used by programmers nowadays, especially in conjunction with numerous preprocessors, plugins, additional tools and packages. The only disadvantage they have, is the need to learn how to use them before actually applying your knowledge into the code. Maybe exactly this is the reason why there are so many of them: it’s naturally that different types of programmers would like to learn and use various types of engines.
Examples of Template Engines
JavaScript
Being one of the most popular programming languages nowadays, JavaScript conquers hearts of programmers and helps to create wonderful websites and applications with interactive and intuitive design, movement and performance. Anyway, even such a great and quite easy-to-learn language, can be very time-consuming, especially when developer has to write thousands of rows of code. This is the reason why website building tools are so popular nowadays and surely will continue to be for many more years. Let us introduce great examples of them for JavaScript language:
Pug/Jade
Pug template engine is created for Node.js. It has short, clean and logical syntax, it’s easy to read and its code templates can be reused in the other languages like Java, Python, Ruby, PHP, etc, which is a huge advantage that is appreciated by full stack developers, who code on several languages. Dedicated team of developers of Mobilunity has experience using this engine as it is very convenient solution when work needs to be done faster for a client.
Dust.js
Being a JavaScript template builder, it was vastly influenced by Mustache language and now is maintained by LinkedIn team of developers. Thanks to the provided interactive tutorial, this template builder is quite easy to begin with. There’s one more plus to the advantages of this engine: the code, compiled in Dust.js easily runs on the client and server side as well, thanks to the fact, that it’s fully written in JS.
EJS
Embedded JavaScript templates or EJS is supported by server-side and browser. It is an engine for those, who love coding with JS, but don’t like to spend time on structuring HTML logic. EJS does all the job with HTML much easier. Programmers often use this one along with Pug template engine in order to make their coding even faster and cleaner.
Nunjucks
Nunjucks is available on all modern web browsers as well as in Node.js. Being supported by Mozilla corp., it gets updates regularly, therefore keeps up with the times. Nunjucks template engine was inspired by Jinja2, which is the engine for Python. This is also a reason why developers tend to wonder whether the same templates could be used between Jinja2 and Nunjucks, but there actually is a slight difference in syntax between these templating engines, which doesn’t allow fully integrate Nunjucks code pieces in Jinja.
Templates for Other Languages:
We are sure, that JavaScript is a very demanded language nowadays, that is why so many companies hire frontend developers for interesting projects. This is also a reason why numerous frameworks and website building tools are created by developers and for them, aiming to ease-up the whole coding process and allow them to work faster. The thing is, that JS is not the only language, which could be templated and needs to be. There are also PHP, C, Python and many other popular languages, that are used by lots of developers in web, mobile and software development. Let’s review just a couple of them:
Mustache
Mustache is a template engine, which is chosen by programmers all over the world, because it is open-source, clean, concise and it’s adapted for a big number of programming languages like C#, Ruby, Python, PHP, Objective-C, Swift, Java, and many others. This engine is as appreciates as it’s argued between developers as well, claiming that it is useless, regarding “logic-less” feature of Mustache as something, that should be eliminated from programming at all. Anyway, there are also many people, who claim that Mustache has much more advantages and can be quite handful sometimes or even capable of replacing traditional way of coding at all. We won’t choose the winner of the battle, because it’s up to anyone what way of coding they choose, especially since there are so many alternatives to Mustache nowadays.
Blade
It is a template builder for the most popular PHP framework – Laravel. It is a simple, but quite powerful engine, because it doesn’t force you to acquire additional knowledge. You can write simple PHP code, except with Blade it will be much easier than without it as it provides you with the ability to code in a more automatized manner.
ClearSilver
There are not so many template engines for C-family languages as there are for JavaScript, for example. ClearSilver is the one, which has to be mentioned for sure, because it is written in C and can be exported to Java, Python, Ruby and Perl, which is a great advantage for developers, who work with multiple languages.
Jinja
This Python template builder was already mentioned above as the one, which Nunjucks was inspired by. It is one of the most popular and widely used template engines among Python developers. There are many engines for Python, which are embedded in frameworks already and they are good only in case all hustle with code is performed within one library. In case some operations have to be executed with templates in outer-libraries, they won’t be processing in a good way. Here comes the Jinja, the best thing about which is the possibility to use the code, written with its help, multiple times in different frames, because it is an independent open-source project.
Overall, there are many more template builders we have not reviewed today, but the ones we’ve mentioned are definitely worth trying as they are regarded life-savers for many developers around the world.
If you want modern website being created exactly for your type of business – hire dedicated team of developers from Mobilunity.
from Review of the Best Template Builders
0 notes
Text
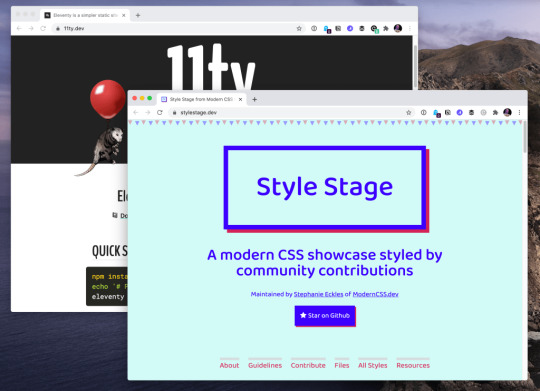
A Community-Driven Site with Eleventy: Preparing for Contributions
I’ve recently found myself reaching for Eleventy (aka 11ty) above all other tools when I want to develop a website. It’s hard to beat a static site generator that provides advanced templating opportunities while otherwise getting out of your way and allowing you to just create.
One of those sites is Style Stage, a modern CSS showcase styled by community contributions. Eleventy was perfect for this community-driven project in several ways:
Its exceptionally fast builds locally and on a production host
It’s un-opinionated about how to construct templates
Its ability to create any file type with complete control over how and where files are rendered
Its ability to intermix templating languages, such as HTML, Markdown, and Nunjucks
It’s highly performant because it compiles to static HTML with no required dependencies for production
The number one reason Eleventy is a great choice for creating a community-driven site is the ability to dynamically create site pages from data sources. We’ll review how to use this feature and more when we create our sample community site.
Article Series:
Preparing for Contributions (You are here!)
Building the Site (Coming tomorrow!)
What goes into creating a community-driven site?
In the not-so-distant past, creating a community-driven site could potentially be a painful process involving CMS nightmares trying to create contributor workflows. Armed with Eleventy and a few other modern tools, this is now nearly fully automatable with a minimum of oversight.
Before we get to inviting contributors, we’ve got some work to do ourselves.
1. Determine what content contributors will have access to modify
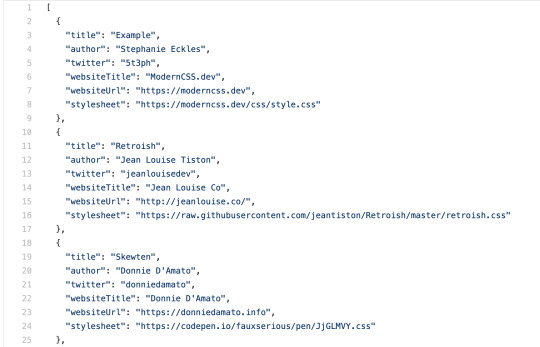
This will guide a lot of the other decisions. In the case of using Eleventy for Style Stage, I created a JSON file that contributors can use to create pull requests to modify and provide their own relevant metadata that’s used to create their pages.

Perhaps you also want to allow access to include additional assets, or maybe it makes sense to have multiple data files for the ease of categorizing and querying data. Or maybe contributors are able to add Markdown files within a particular directory.
Consider the scope of what contributors can modify or submit, and weigh that against an estimate of your availability to review submissions. This will help enable a successful, manageable community.
GitHub actions can make it possible to label or close a pull request with invalid files if you need advanced automated screening of incoming content.
2. Create contributor guidelines
Spending time upfront to think through your guidelines can help with your overall plan. You may identify additional needed features, or items that can be automated.
Once your guidelines are prepared, it’s best to include them in a special file in your GitHub repository called CONTRIBUTING.md. The all-caps filename is the expected format. Having this file creates an automatic extra link for contributors when they are creating their pull request or issues in a prompt that ask them to be sure they’ve reviewed the guidelines:

Screenshot courtesy of the GitHub documentation.
How to handle content licensing and author attribution are things that fall into this category. For example, Style Stage releases contributed stylesheets under the CC BY-NC-SA license but authors retain copyright over original graphics. As part of the build process, the license and author attribution are appended to the styles, and the authors attribution metadata is updated within the style page template.
You’ll also want to consider policies around acceptable content and what would cause submissions to be rejected. Style Stage states that:
Submissions will be rejected for using obscene, excessively violent, or otherwise distasteful imagery, violating the above guidelines, or other reasons at the discretion of the maintainer.
3. Prepare workflow and automations
While Eleventy takes care of the site build, the other key players enabling Style Stage contributions are Netlify and GitHub.
Contributors submit a pull request to the Style Stage repo on GitHub and, when they do, Netlify creates a deploy preview. This allows contributors to verify that their submission works as expected, and saves me time as the maintainer by not having to pull down submissions to ensure they meet the guidelines.

The status of the Netlify deploy updates in real-time on the pull request review page. Once the last item (“/deploy-preview”) displays “Deploy preview ready!” clicking “Details” will launch the live link to the preview.
All discussion takes place through GitHub. This has the added advantage of public accountability which helps dissuade bad actors.
If the contributor needs to make a change, they can update their pull request or request a re-deploy of the branch preview if it’s a remote asset that has changed. This re-deploy is a very small manual step, and it may not be needed for every PR — or even at all, depending on how you accept contributions.
The last step is the final approval of the PR and merging into the main branch. Once the pull request is merged, Netlify immediately deploys the changes to production.
Eleventy is, of course, a static site generator, and several hosts offer webhooks to trigger a build. Netlify’s build plugins are a good example of that. But if you need to refresh data more often than each time a PR is merged, one option is to use IFTTT or Zapier to set up daily deploys, or deploys based on a variety of other triggers.
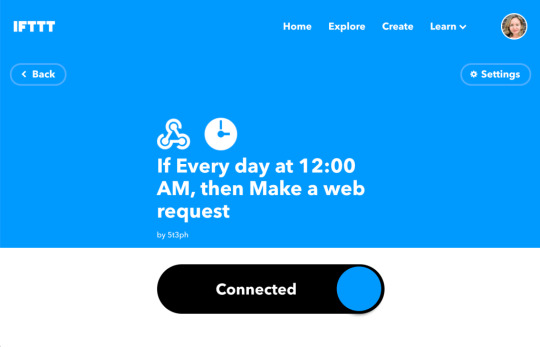
Example of completed setup of a daily deploy via webhook from IFTTT
It’s worth noting that what we’re talking about here does limit your contributor audience to having a GitHub account. However, GitHub contributions can be done entirely via the web interface, so it’s very possible to provide guidance so that other users — even those who don’t code — can still participate.
4. Choose a method for contributor and community updates
The first consideration here is to decide how critical it is for contributors to know about updates to your site by evaluating the likely impact of the change.
In the case of Style Stage, the core will be unchanging, but there is some planned optional functionality. I went with a weekly(-ish) newsletter. That way, it is something folks can opt into and there is value for contributors and users alike.
Matthew Ström’s “Using Netlify Forms and Netlify Functions to Build an Email Sign-Up Widget” is a great place to learn how to add subscribers to your newsletter with a static form in Eleventy. It also covers a function for sending the subscriber’s email to Buttondown, a lightweight email service. For an example of how to manage your Buttondown email template and content in Eleventy, review the Style Stage setup which shows how to exclude the newsletter from the published site build.
If you’re only expecting low priority updates, then GitHub’s repo notifications might be sufficient for communication. Creating releases is another way to go. Or, hey, it’s even possible to to incorporate notifications on the site itself.
5. Find and engage with potential contributors
Style Stage was an idea that I vetted by tossing out a poll on Twitter. I then put out a “call for contributors” and engaged with responders as well as those who retweeted me. A short timeline also helped find motivated contributors who helped Style Stage avoid launching without any submissions. Many of those contributors became evangelists that introduced Style Stage to even more people. I also promoted a launch livestream which doubled as promotional material.
This is what it means to “engage” with contributors. Creating avenues for engagement and staying engaged with them helps turn casual contributors into “fans” who encourage others to participate.
Remember that the site content is a great place to encourage participation! Style Stage dedicates its entire page to encouraging submissions. If that’s not possible for you, then you might consider using prompts for contributions where it makes sense.
6. Finalize repo settings and include community health files
Finally, ensure that your repository is published publicly and that it includes applicable “community health” files. These are meant to be documents that help establish guidelines, set good expectations with community members, define a code of conduct, and other information that contribute to the overall “health” of the community. There are a bunch of examples, suggestions and tips on how to do this in the GitHub docs.
While there are a half dozen files noted in the documentation, in my experience so far, the three files you’ll need at minimum are:
a README.md file at the root of the project that includes the project’s name and a good description of what it is. GitHub will display the contents below the list of files in the repo.
a CONTRIBUTING.md file that describes the submission process for contributions. Be explicit as far as what steps are involved and what constitutes a “good” submission.
a pull request template. I wouldn’t exactly say this is a mandatory thing, but it’s worth adding to this list because it further solidifies the expectations for submitting contributions. Many templates will even include a checklist that details requirements for approval.
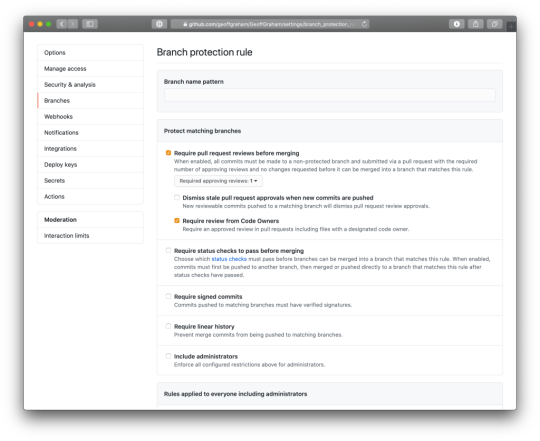
Oh, and having a branch protection rule on the main branch is another good idea. You can do this by going to Settings → Branches from the repo and selecting the “Add rule” option. “Require pull request reviews before merging” and “Require review from Code Owners” are the two key settings to enable. You can check the GitHub docs to learn more about this protection.

Coming up next…
What we covered here is a starting point for creating a community-driven site with Eleventy. The point is that there are several things that need to be considered before we jump straight into code. Communities need care and that requires a few steps that help establish an engaged and healthy community.
You’re probably getting anxious to start coding a community site with Eleventy! Well, that’s coming up in the next installment of this two-parter. Together, we’ll develop an Eleventy starter from scratch that you can extend for your own community (or personal) site.
Article Series:
Preparing for Contributions (You are here!)
Building the Site (Coming tomorrow!)
The post A Community-Driven Site with Eleventy: Preparing for Contributions appeared first on CSS-Tricks.
You can support CSS-Tricks by being an MVP Supporter.
A Community-Driven Site with Eleventy: Preparing for Contributions published first on https://deskbysnafu.tumblr.com/
0 notes
Text
A Community-Driven Site with Eleventy: Preparing for Contributions
I’ve recently found myself reaching for Eleventy (aka 11ty) above all other tools when I want to develop a website. It’s hard to beat a static site generator that provides advanced templating opportunities while otherwise getting out of your way and allowing you to just create.
One of those sites is Style Stage, a modern CSS showcase styled by community contributions. Eleventy was perfect for this community-driven project in several ways:
Its exceptionally fast builds locally and on a production host
It’s un-opinionated about how to construct templates
Its ability to create any file type with complete control over how and where files are rendered
Its ability to intermix templating languages, such as HTML, Markdown, and Nunjucks
It’s highly performant because it compiles to static HTML with no required dependencies for production

The number one reason Eleventy is a great choice for creating a community-driven site is the ability to dynamically create site pages from data sources. We’ll review how to use this feature and more when we create our sample community site.
Article Series:
Preparing for Contributions (You are here!)
Building the Site (Coming tomorrow!)
What goes into creating a community-driven site?
In the not-so-distant past, creating a community-driven site could potentially be a painful process involving CMS nightmares trying to create contributor workflows. Armed with Eleventy and a few other modern tools, this is now nearly fully automatable with a minimum of oversight.
Before we get to inviting contributors, we’ve got some work to do ourselves.
1. Determine what content contributors will have access to modify
This will guide a lot of the other decisions. In the case of using Eleventy for Style Stage, I created a JSON file that contributors can use to create pull requests to modify and provide their own relevant metadata that’s used to create their pages.
Perhaps you also want to allow access to include additional assets, or maybe it makes sense to have multiple data files for the ease of categorizing and querying data. Or maybe contributors are able to add Markdown files within a particular directory.
Consider the scope of what contributors can modify or submit, and weigh that against an estimate of your availability to review submissions. This will help enable a successful, manageable community.
GitHub actions can make it possible to label or close a pull request with invalid files if you need advanced automated screening of incoming content.
2. Create contributor guidelines
Spending time upfront to think through your guidelines can help with your overall plan. You may identify additional needed features, or items that can be automated.
Once your guidelines are prepared, it’s best to include them in a special file in your GitHub repository called CONTRIBUTING.md. The all-caps filename is the expected format. Having this file creates an automatic extra link for contributors when they are creating their pull request or issues in a prompt that ask them to be sure they’ve reviewed the guidelines:

Screenshot courtesy of the GitHub documentation.
How to handle content licensing and author attribution are things that fall into this category. For example, Style Stage releases contributed stylesheets under the CC BY-NC-SA license but authors retain copyright over original graphics. As part of the build process, the license and author attribution are appended to the styles, and the authors attribution metadata is updated within the style page template.
You’ll also want to consider policies around acceptable content and what would cause submissions to be rejected. Style Stage states that:
Submissions will be rejected for using obscene, excessively violent, or otherwise distasteful imagery, violating the above guidelines, or other reasons at the discretion of the maintainer.
3. Prepare workflow and automations
While Eleventy takes care of the site build, the other key players enabling Style Stage contributions are Netlify and GitHub.
Contributors submit a pull request to the Style Stage repo on GitHub and, when they do, Netlify creates a deploy preview. This allows contributors to verify that their submission works as expected, and saves me time as the maintainer by not having to pull down submissions to ensure they meet the guidelines.
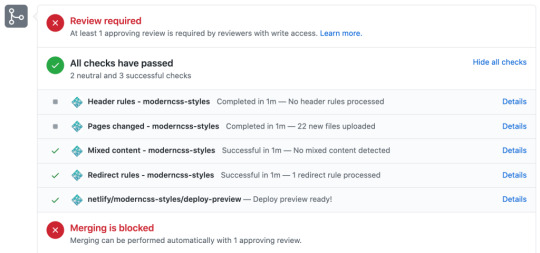
The status of the Netlify deploy updates in real-time on the pull request review page. Once the last item (“/deploy-preview”) displays “Deploy preview ready!” clicking “Details” will launch the live link to the preview.
All discussion takes place through GitHub. This has the added advantage of public accountability which helps dissuade bad actors.
If the contributor needs to make a change, they can update their pull request or request a re-deploy of the branch preview if it’s a remote asset that has changed. This re-deploy is a very small manual step, and it may not be needed for every PR — or even at all, depending on how you accept contributions.
The last step is the final approval of the PR and merging into the main branch. Once the pull request is merged, Netlify immediately deploys the changes to production.
Eleventy is, of course, a static site generator, and several hosts offer webhooks to trigger a build. Netlify’s build plugins are a good example of that. But if you need to refresh data more often than each time a PR is merged, one option is to use IFTTT or Zapier to set up daily deploys, or deploys based on a variety of other triggers.

Example of completed setup of a daily deploy via webhook from IFTTT
It’s worth noting that what we’re talking about here does limit your contributor audience to having a GitHub account. However, GitHub contributions can be done entirely via the web interface, so it’s very possible to provide guidance so that other users — even those who don’t code — can still participate.
4. Choose a method for contributor and community updates
The first consideration here is to decide how critical it is for contributors to know about updates to your site by evaluating the likely impact of the change.
In the case of Style Stage, the core will be unchanging, but there is some planned optional functionality. I went with a weekly(-ish) newsletter. That way, it is something folks can opt into and there is value for contributors and users alike.
Matthew Ström’s “Using Netlify Forms and Netlify Functions to Build an Email Sign-Up Widget” is a great place to learn how to add subscribers to your newsletter with a static form in Eleventy. It also covers a function for sending the subscriber’s email to Buttondown, a lightweight email service. For an example of how to manage your Buttondown email template and content in Eleventy, review the Style Stage setup which shows how to exclude the newsletter from the published site build.
If you’re only expecting low priority updates, then GitHub’s repo notifications might be sufficient for communication. Creating releases is another way to go. Or, hey, it’s even possible to to incorporate notifications on the site itself.
5. Find and engage with potential contributors
Style Stage was an idea that I vetted by tossing out a poll on Twitter. I then put out a “call for contributors” and engaged with responders as well as those who retweeted me. A short timeline also helped find motivated contributors who helped Style Stage avoid launching without any submissions. Many of those contributors became evangelists that introduced Style Stage to even more people. I also promoted a launch livestream which doubled as promotional material.
This is what it means to “engage” with contributors. Creating avenues for engagement and staying engaged with them helps turn casual contributors into “fans” who encourage others to participate.
Remember that the site content is a great place to encourage participation! Style Stage dedicates its entire page to encouraging submissions. If that’s not possible for you, then you might consider using prompts for contributions where it makes sense.
6. Finalize repo settings and include community health files
Finally, ensure that your repository is published publicly and that it includes applicable “community health” files. These are meant to be documents that help establish guidelines, set good expectations with community members, define a code of conduct, and other information that contribute to the overall “health” of the community. There are a bunch of examples, suggestions and tips on how to do this in the GitHub docs.
While there are a half dozen files noted in the documentation, in my experience so far, the three files you’ll need at minimum are:
a README.md file at the root of the project that includes the project’s name and a good description of what it is. GitHub will display the contents below the list of files in the repo.
a CONTRIBUTING.md file that describes the submission process for contributions. Be explicit as far as what steps are involved and what constitutes a “good” submission.
a pull request template. I wouldn’t exactly say this is a mandatory thing, but it’s worth adding to this list because it further solidifies the expectations for submitting contributions. Many templates will even include a checklist that details requirements for approval.
Oh, and having a branch protection rule on the main branch is another good idea. You can do this by going to Settings → Branches from the repo and selecting the “Add rule” option. “Require pull request reviews before merging” and “Require review from Code Owners” are the two key settings to enable. You can check the GitHub docs to learn more about this protection.
Coming up next…
What we covered here is a starting point for creating a community-driven site with Eleventy. The point is that there are several things that need to be considered before we jump straight into code. Communities need care and that requires a few steps that help establish an engaged and healthy community.
You’re probably getting anxious to start coding a community site with Eleventy! Well, that’s coming up in the next installment of this two-parter. Together, we’ll develop an Eleventy starter from scratch that you can extend for your own community (or personal) site.
Article Series:
Preparing for Contributions (You are here!)
Building the Site (Coming tomorrow!)
The post A Community-Driven Site with Eleventy: Preparing for Contributions appeared first on CSS-Tricks.
You can support CSS-Tricks by being an MVP Supporter.
A Community-Driven Site with Eleventy: Preparing for Contributions published first on https://deskbysnafu.tumblr.com/
0 notes
Text
A Site for Front-End Development Conferences (Built with 11ty on Netlify)
I built a new little site! It's a site for listing upcoming conferences in the world of front-end web design and development. In years past (like 2017), Sarah Drasner took up this daunting job. We used a form for new conference submissions, but it was still a rather manual task of basically manually editing a blog post. I wanted to keep doing this, as I think it's valuable to have a simple reference page for conferences in our niche slice of the web, but I wanted the site to be able to live on year after year with lower maintenance-related technical debt.
So this is what I did!
I wanted to get it on GitHub.
So I put it there. Part of the beauty of GitHub is that it opens up the idea of collaboration through pull requests to really anyone in the world. You need to have a GitHub account, but that's free, and you need to understand Git at least on some minor level (which is a barrier that I'd like to resolve in time), but it invites more collaboration than something like just asking people to email you content and ideas.
I wanted the content in Markdown in the Repo.
The Front Matter format, which is Markdown with some data the the top, is such a useful and approachable format. You need almost zero knowledge, not even HTML, to be able to create/edit a file like this:
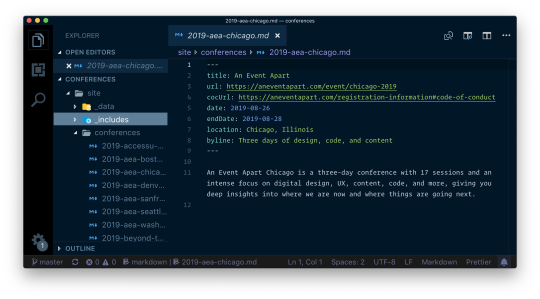
Having the actual conference data in the repo means that pull requests aren't just for design or features; more commonly, they will be for actual conference data. The work of making this site full of all the best conferences is the work of all of us, not just one of us.
At the time of this writing there have already been 30 closed pull requests.
I used 11ty to build the site.
11ty is almost fascinatingly simple. It looks in one directory for what it needs to process or move to another directory. It supports my favorite templating system out of the box: Nunjucks. Plus front matter Markdown like I mentioned above.
I was able to essentially design a card that displays the data we get from the Markdown files, and then build the homepage of the site by looping over those Markdown files and applying the templated card.
11ty is based on Node.js, so while I did have some learning-curve moments, it was comfortable for me to work in. There definitely is configuration for doing the things I wanted to be doing. For example, this is how I had to make a "collection" of conferences in order to loop over them:
config.addCollection("conferences", function(collection) { let allConferences = collection.getFilteredByGlob("site/conferences/*.md"); let futureConferences = allConferences.filter(conf => { return conf.data.date >= new Date(); }); return futureConferences; });
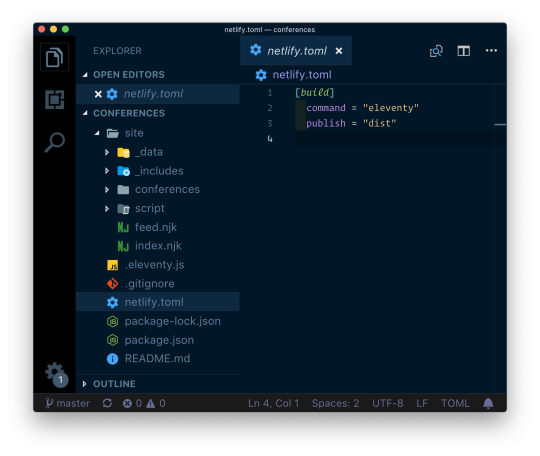
The site is hosted on Netlify.
One reason to use Netlify here is that it's incredibly easy. I made a site site in Netlify by connecting it to the GitHub repo. I told it how to build the site (it's a single command: eleventy) and where the built site files are (dist), and that's it. In fact, that's even part of the repo:
Now whenever I push to the master branch (or accept a pull request into master), the site automatically rebuilds and deploys. Just takes seconds. It's really amazing.
Better, for each pull request, Netlify makes sure everything is in order first:
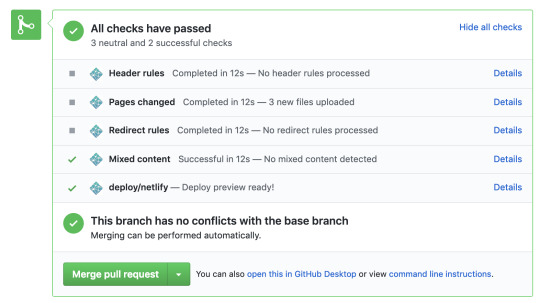
My favorite is the deploy preview. It gives you an (obscure) URL that will literally last forever (immutable) and that serves as a look at the built version of this site with that pull request.
So, not only is it extremely easy to use Netlify, but I get a bunch of stuff for free, like the fact that the site is smokin' fast on their CDNs and such.
I'm also excited that I've barely tapped into Netlify's features here, so there is a lot of stuff I can dig into over time. And I intend to!
I use Zapier to re-build the site every day.
There is a bit of a time-sensitive nature to this site. The point of this site is to reference it for upcoming conferences. It's less interesting to see past conferences (although maybe we can have a browse-able archive in the future). I like the idea of ripping off past conferences for the homepage. If this was PHP (or whatever), we could do that at runtime, but this is a static site (on purpose). Doing something like this at build time is no big deal (see that code snippet above that only returns conferences past today's date). But we can't just waiting around for pull requests to re-build the site, nor do I want to make it a manual thing I need to do every day.
Fortunately, this is easy as pie with Zapier:

Phil Hawksworth took this to the extreme once and built a clock website that rebuilds every minute.
This site wasn't just an experiment. I'd like to keep it going! If you're part of running a conference, I'm quite sure it doesn't hurt to add it to add yours, just so long as it has an enforcable and actionable Code of Conduct, and is within the world of front-end web design and development.
The post A Site for Front-End Development Conferences (Built with 11ty on Netlify) appeared first on CSS-Tricks.
😉SiliconWebX | 🌐CSS-Tricks
0 notes
Text
A Community-Driven Site with Eleventy: Building the Site
In the last article, we learned what goes into planning for a community-driven site. We saw just how many considerations are needed to start accepting user submissions, using what I learned from my experience building Style Stage as an example.
Now that we’ve covered planning, let’s get to some code! Together, we’re going to develop an Eleventy setup that you can use as a starting point for your own community (or personal) site.
Article Series:
Preparing for Contributions
Building the Site (You are here!)
This article will cover:
How to initialize Eleventy and create useful develop and build scripts
Recommended setup customizations
How to define custom data and combine multiple data sources
Creating layouts with Nunjucks and Eleventy layout chaining
Deploying to Netlify
The vision
Let’s assume we want to let folks submit their dogs and cats and pit them against one another in cuteness contests.
Live demo
We’re not going to get into user voting in this article. That would be so cool (and totally possible with serverless functions) but our focus is on the pet submissions themselves. In other words, users can submit profile details for their cats and dogs. We’ll use those submissions to create a weekly battle that puts a random cat up against a random dog on the home page to duke it out over which is the most purrrfect (or woof-tastic, if you prefer).
Let’s spin up Eleventy
We’ll start by initializing a new project by running npm init on any directory you’d like, then installing Eleventy into it with:
npm install @11ty/eleventy
While it’s totally optional, I like to open up the package-json file that’s added to the directory and replace the scripts section with this:
"scripts": { "develop": "eleventy --serve", "build": "eleventy" },
This allows us to start developing Eleventy in a development environment (npm run develop) that includes Browsersync hot-reloading for local development. It also adds a command that compiles and builds our work (npm run build) for deployment on a production server.
If you’re thinking, “npm what?” what we’re doing is calling on Node (which is something Eleventy requires). The commands noted here are intended to be run in your preferred terminal, which may be an additional program or built-in to your code editor, like it is in VS Code.
We’ll need one more npm package, fast-glob, that will come in handy a little later for combining data. We may as well install it now:
npm install --save-dev fast-glob.
Let’s configure our directory
Eleventy allows customizing the input directory (where we work) and output directory (where our built work goes) to provide a little extra organization.
To configure this, we’ll create the eleventy.js file at the root of the project directory. Then we’ll tell Eleventy where we want our input and output directories to go. In this case, we’re going to use a src directory for the input and a public directory for the output.
module.exports = function (eleventyConfig) { return dir: { input: "src", output: "public" }, }; };
Next, we’ll create a directory called pets where we’ll store the pets data we get from user submissions. We can even break that directory down a little further to reduce merge conflicts and clearly distinguish cat data from dog data with cat and dog subdirectories:
pets/ cats/ dogs/
What’s the data going to look like? Users will send in a JSON file that follows this schema, where each property is a data point about the pet:
{ "name": "", "petColor": "", "favoriteFood": "", "favoriteToy": "", "photoURL": "", "ownerName": "", "ownerTwitter": "" }
To make the submission process crystal clear for users, we can create a CONTRIBUTING.md file at the root of the project and write out the guidelines for submissions. GitHub takes the content in this file and uses displays it in the repo. This way, we can provide guidance on this schema such as a note that favoriteFood, favoriteToy, and ownerTwitte are optional fields.
A README.md file would be just as fine if you’d prefer to go that route. It’s just nice that there’s a standard file that’s meant specifically for contributions.
Notice photoURL is one of those properties. We could’ve made this a file but, for the sake of security and hosting costs, we’re going to ask for a URL instead. You may decide that you are willing to take on actual files, and that’s totally cool.
Let’s work with data
Next, we need to create a combined array of data out of the individual cat files and dog files. This will allow us to loop over them to create site pages and pick random cat and dog submissions for the weekly battles.
Eleventy allows node module.exports within the _data directory. That means we can create a function that finds all cat files and another that finds all dog files and then creates arrays out of each set. It’s like taking each cat file and merging them together to create one data set in a single JavaScript file, then doing the same with dogs.
The filename used in _data becomes the variable that holds that dataset, so we’ll add files for cats and dogs in there:
_data/ cats.js dogs.js
The functions in each file will be nearly identical — we’re merely swapping instances of “cat” for “dog” between the two. Here’s the function for cats:
const fastglob = require("fast-glob"); const fs = require("fs");
module.exports = async () => { // Create a "glob" of all cat json files const catFiles = await fastglob("./src/pets/cats/*.json", { caseSensitiveMatch: false, });
// Loop through those files and add their content to our `cats` Set let cats = new Set(); for (let cat of catFiles) { const catData = JSON.parse(fs.readFileSync(cat)); cats.add(catData); }
// Return the cats Set of objects within an array return [...cats]; };
Does this look scary? Never fear! I do not routinely write node either, and it’s not a required step for less complex Eleventy sites. If we had instead chosen to have contributors add to an ever growing single JSON file with _data, then this combination step wouldn’t be necessary in the first place. Again, the main reason for this step is to reduce merge conflicts by allowing for individual contributor files. It’s also the reason we added fast-glob to the mix.
Let’s output the data
This is a good time to start plugging data into the templates for our UI. In fact, go ahead and drop a few JSON files into the pets/cats and pets/dogs directories that include data for the properties so we have something to work with right out of the gate and test things.
We can go ahead and add our first Eleventy page by adding a index.njk file in the src directory. This will become the home page, and is a Nunjucks template file format.
Nunjucks is one option of many for creating templates with Eleventy. See the docs for a full list of templating options.
Let’s start by looping over our data and outputting an unordered list both for cats and dogs:
<ul> <!-- Loop through cat data --> </ul>
<ul> <!-- Loop through dog data --> </ul>
As a reminder, the reference to cats and dogs matches the filename in _data. Within the loop we can access the JSON keys using dot notation, as seen for cat.name, which is output as a Nunjucks template variable using double curly braces (e.g. ).
Let’s create pet profile pages
Besides lists of cats and dogs on the home page (index.njk), we also want to create individual profile pages for each pet. The loop indicated a hint at the structure we’ll use for those, which will be [pet type]/[name-slug].
The recommended way to create pages from data is via the Eleventy concept of pagination which allows chunking out data.
We’re going to create the files responsible for the pagination at the root of the src directory, but you could nest them in a custom directory, as long as it lives within src and can still be discovered by Eleventy.
src/ cats.njk dogs.njk
Then we’ll add our pagination information as front matter, shown for cats:
--- pagination: data: cats alias: cat size: 1 permalink: "/cats//" ---
The data value is the filename from _data. The alias value is optional, but is used to reference one item from the paginated array. size: 1 indicates that we’re creating one page per item of data.
Finally, in order to successfully create the page output, we need to also indicate the desired permalink structure. That’s where the alias value above comes into play, which accesses the name key from the dataset. Then we are using a built-in filter called slug that transforms a string value into a URL-friendly string (lowercasing and converting spaces to dashes, etc).
Let’s review what we have so far
Now is the time to fire up Eleventy with npm run develop. That will start the local server and show you a URL in the terminal you can use to view the project. It will show build errors in the terminal if there are any.
As long as all was successful, Eleventy will create a public directory, which should contain:
public/ cats/ cat1-name/index.html cat2-name/index.html dogs/ dog1-name/index.html dog2-name/index.html index.html
And in the browser, the index page should display one linked list of cat names and another one of linked dog names.
Let’s add data to pet profile pages
Each of the generated pages for cats and dogs is currently blank. We have data we can use to fill them in, so let’s put it to work.
Eleventy expects an _includes directory that contains layout files (“templates”) or template partials that are included in layouts.
We’ll create two layouts:
src/ _includes/ base.njk pets.njk
The contents of base.njk will be an HTML boilerplate. The <body> element in it will include a special template tag, , where content passed into the template will render, with safe meaning it can render any HTML that is passed in versus encoding it.
Then, we can assign the homepage, index.md, to use the base.njk layout by adding the following as front matter. This should be the first thing in index.md, including the dashes:
--- layout: base.njk ---
If you check the compiled HTML in the public directory, you’ll see the output of the cat and dog loops we created are now within the <body> of the base.njk layout.
Next, we’ll add the same front matter to pets.njk to define that it will also use the base.njk layout to leverage the Eleventy concept of layout chaining. This way, the content we place in pets.njk will be wrapped by the HTML boilerplate in base.njk so we don’t have to write out that HTML each and every time.
In order to use the single pets.njk template to render both cat and dog profile data, we’ll use one of the newest Eleventy features called computed data. This will allow us to assign values from the cats and dogs data to the same template variables, as opposed to using if statements or two separate templates (one for cats and one for dogs). The benefit is, once again, to avoid redundancy.
Here’s the update needed in cats.njk, with the same update needed in dogs.njk (substituting cat with dog):
eleventyComputed: title: "" petColor: "" favoriteFood: "" favoriteToy: "" photoURL: "" ownerName: "" ownerTwitter: ""
Notice that eleventyComputed defines this front matter array key and then uses the alias for accessing values in the cats dataset. Now, for example, we can just use to access a cat’s name and a dog’s name since the template variable is now the same.
We can start by dropping the following code into pets.njk to successfully load cat or dog profile data, depending on the page being viewed:
<img src="" /> <ul> <li><strong>Name</strong>: </li> <li><strong>Color</strong>: </li> <li><strong>Favorite Food</strong>: </li> <li><strong>Favorite Toy</strong>: </li> <li><strong>Owner</strong>: </li> </ul>
The last thing we need to tie this all together is to add layout: pets.njk to the front matter in both cats.njk and dogs.njk.
With Eleventy running, you can now visit an individual pet page and see their profile:
Fancy Feast for a fancy cat. 😻
We’re not going into styling in this article, but you can head over to the sample project repo to see how CSS is included.
Let’s deploy this to production!
The site is now in a functional state and can be deployed to a hosting environment!
As recommended earlier, Netlify is an ideal choice, particularly for a community-driven site, since it can trigger a deployment each time a submission is merged and provide a preview of the submission before sending it for review.
If you choose Netlify, you will want to push your site to a GitHub repo which you can select during the process of adding a site to your Netlify account. We’ll tell Netlify to serve from the public directory and run npm run build when new changes are merged into the main branch.
The sample site includes a netlify.toml file which has the build details and is automatically detected by Netlify in the repo, removing the need to define the details in the new site flow.
Once the initial site is added, visit Settings → Build → Deploy in Netlify. Under Deploy contexts, select “Edit” and update the selection for “Deploy Previews” to “Any pull request against your production branch / branch deploy branches.” Now, for any pull request, a preview URL will be generated with the link being made available directly in the pull request review screen.
Let’s start accepting submissions!
Before we pass Go and collect $100, it’s a good idea to revisit the first post and make sure we’re prepared to start taking user submissions. For example, we ought to add community health files to the project if they haven’t already been added. Perhaps the most important thing is to make sure a branch protection rule is in place for the main branch. This means that your approval is required prior to a pull request being merged.
Contributors will need to have a GitHub account. While this may seem like a barrier, it removes some of the anonymity. Depending on the sensitivity of the content, or the target audience, this can actually help vet (get it?) contributors.
Here’s the submission process:
Fork the website repository.
Clone the fork to a local machine or use the GitHub web interface for the remaining steps.
Create a unique .json file within src/pets/cats or src/pets/dogs that contains required data.
Commit the changes if they’re made on a clone, or save the file if it was edited in the web interface.
Open a pull request back to the main repository.
(Optional) Review the Netlify deploy preview to verify information appears as expected.
Merge the changes.
Netlify deploys the new pet to the live site.
A FAQ section is a great place to inform contributors how to create pull request. You can check out an example on Style Stage.
Let’s wrap this up…
What we have is fully functional site that accepts user contributions as submissions to the project repo. It even auto-deploys those contributions for us when they’re merged!
There are many more things we can do with a community-driven site built with Eleventy. For example:
Markdown files can be used for the content of an email newsletter sent with Buttondown. Eleventy allows mixing Markdown with Nunjucks or Liquid. So, for example, you can add a Nunjucks for loop to output the latest five pets as links that output in Markdown syntax and get picked up by Buttondown.
Auto-generated social media preview images can be made for social network link previews.
A commenting system can be added to the mix.
Netlify CMS Open Authoring can be used to let folks make submissions with an interface. Check out Chris’ great rundown of how it works.
My Meow vs. BowWow example is available for you to fork on GitHub. You can also view the live preview and, yes, you really can submit your pet to this silly site. 🙂
Best of luck creating a healthy and thriving community!
Article Series:
Preparing for Contributions
Building the Site (You are here!)
The post A Community-Driven Site with Eleventy: Building the Site appeared first on CSS-Tricks.
You can support CSS-Tricks by being an MVP Supporter.
A Community-Driven Site with Eleventy: Building the Site published first on https://deskbysnafu.tumblr.com/
0 notes
Text
What ya need there is a bit of templating
I had a fella write in to me the other day. He had some HTML, CSS, and JavaScript, and it just wasn’t behaving like he thought it ought to. The HTML had some placeholders in it and the JavaScript had some data in it, and the assumption was that the data would fill the placeholders.
To those of us with some degree of web knowledge, we can look at this and see why it’s not working like he thought it would. But I think it’s also valuable to try to see things from that perspective and then look at solutions that are hopefully as simple as the original problem seems to be.
The HTML was something like this…
<!DOCTYPE html> <html lang="en"> <head> <meta charset="utf-8"> <title>Test</title> <link rel="stylesheet" href="test.css"> <script src="data.js"></script> </head> <body> <section> <div>{company_name}</div> </section> </body> </html>
The JavaScript was like this…
var company_data = { "{company_name}" : "SOME COMPANY", };
There is nothing invalid going on here.
That’s all perfectly valid code. It is linked up right. It will run. It just doesn’t do anything besides render {company_name} to the screen. The expectation is that it would render SOME COMPANY to the screen instead, replacing the {company_name} placeholder with the data from the JavaScript file.
Let’s fix it with a one-liner.
In this exact scenario, to display the correct company name, we need to select that element in the DOM and replace its content with our data. We could do that by adding this one extra line to the JavaScript:
var company_data = { "{company_name}": "SOME COMPANY" }; document.querySelector("div").innerHTML = company_data["{company_name}"];
That’s not particularly re-usable or resiliant, but hey, it’s also not over-thinking or over-tooling it.
The expectation was templating
I think we can see at this point that what he hoped would happen is that this sort of templating would automatically happen. Provide an object with keys that match what is in the HTML, the content in that HTML is automatically swapped out. It just doesn’t work that way with raw web technologies.
No joke, there are hundreds of ways to go about handling this. Here’s a few off the top of my head:
Use a templating language like Handlebars or Mustache
Use a static site generator like Eleventy, which uses Liquid by default
Make an HTML <template> and write your own script to use it
Make a Web Component
Use a back-end language instead, or a language like Nunjucks to process ahead of time
Use a preprocessor like Pug
As a general preference, I’d say doing the templating server-side or during a build is ideal — why mess with the DOM if you don’t need to?
But just to ignore that advice for a second, here’s an example of doing it client-side with Handlebars, just so the fella from the original email has a working example of how that can work:
CodePen Embed Fallback
The post What ya need there is a bit of templating appeared first on CSS-Tricks.
You can support CSS-Tricks by being an MVP Supporter.
What ya need there is a bit of templating published first on https://deskbysnafu.tumblr.com/
0 notes
Text
Naming things to improve accessibility
I like the this wrap-up statement from Hidde de Vries:
In modern browsers, our markup becomes an accessibility tree that ultimately informs what our interface looks like to assistive technologies. It doesn’t matter as much whether you’ve written this markup:
in a .html file
in Twig, Handlebars or Nunjucks
as the <template> in a Vue Single File Component
exported in the JSX of your React component
outputted by a weird legacy CMS
It is which markup that determines if your site is pleasurable to experience for AT users. In short: it’s the markup that matters
As a front-end developer, you'll find yourself writing markup in lots of different places with lots of different technologies. I think it behooves you think of how best to write it regardless of where and how.
Direct Link to Article — Permalink
The post Naming things to improve accessibility appeared first on CSS-Tricks.
Naming things to improve accessibility published first on https://deskbysnafu.tumblr.com/
0 notes
Text
Naming things to improve accessibility
I like the this wrap-up statement from Hidde de Vries:
In modern browsers, our markup becomes an accessibility tree that ultimately informs what our interface looks like to assistive technologies. It doesn’t matter as much whether you’ve written this markup:
in a .html file
in Twig, Handlebars or Nunjucks
as the <template> in a Vue Single File Component
exported in the JSX of your React component
outputted by a weird legacy CMS
It is which markup that determines if your site is pleasurable to experience for AT users. In short: it’s the markup that matters
As a front-end developer, you'll find yourself writing markup in lots of different places with lots of different technologies. I think it behooves you think of how best to write it regardless of where and how.
Direct Link to Article — Permalink
The post Naming things to improve accessibility appeared first on CSS-Tricks.
😉SiliconWebX | 🌐CSS-Tricks
0 notes
Text
The Simplest Ways to Handle HTML Includes
It's extremely surprising to me that HTML has never had any way to include other HTML files within it. Nor does there seem to be anything on the horizon that addresses it. I'm talking about straight up includes, like taking a chunk of HTML and plopping it right into another. For example the use case for much of the entire internet, an included header and footer for all pages:
... <body> <include src="./header.html"></include> Content <include src="./footer.html"></include> </body> ...
That's not real, by the way. I just wish it was.
People have been looking to other languages to solve this problem for them forever. It's HTML preprocessing, in a sense. Long before we were preprocessing our CSS, we were using tools to manipulate our HTML. And we still are, because the idea of includes is useful on pretty much every website in the world.
Use PHP
Can you use PHP instead?
... <body> <?php include "./header.html" ?> Content <?php include "./footer.html" ?> </body> ...
This will perform the include at the server level, making the request for it happen at the file system level on the server, so it should be far quicker than a client-side solution.
Use Gulp
What's even faster than a server-side include? If the include is preprocessed before it's even on the server. Gulp has a variety of processors that can do this. One is gulp-file-include.
That would look like this:
... <body> @@include('./header.html') Content @@include('./footer.html') </body> ...
And you'd process it like:
var fileinclude = require('gulp-file-include'), gulp = require('gulp'); gulp.task('fileinclude', function() { gulp.src(['index.html']) .pipe(fileinclude({ prefix: '@@', basepath: '@file' })) .pipe(gulp.dest('./')); });
Looks like this particular plugin has fancy features where you can pass in variables to the includes, making it possible to make little data-driven components.
Use Grunt
This is what the grunt-bake plugin does. You'd configure Grunt to process your HTML:
grunt.initConfig({ bake: { your_target: { files: { "dist/index.html": "app/index.html", } } } });
Then your HTML can use this special syntax for includes:
... <body> <!--(bake header.html)--> Content <!--(bake footer.html)--> </body> ...
Use Handlebars
Handlebars has partials.
You register them:
Handlebars.registerPartial('myPartial', '')
Then use them:
There is also fancy features of this that allow for evaluation and passing data. You'll still need a processor to run it, probably something like gulp-handlebars.
Speaking of templating languages which make use of curly braces... Mustache has them, too.
Use Pug
Pug is an HTML preprocessor that has a whole new syntax for HTML that is a bit more terse. It's got includes though.
... body include ./header.html" p Content include ./footer.html" ...
Then you run it with something like gulp-pug.
Use Nunjucks
I love me some Nunjucks! Nunjucks has includes. You'd do it like this:
... <body> Liquid error: This liquid context does not allow includes. Content Liquid error: This liquid context does not allow includes. </body> ...
If you put that in a file called index.njk, you could process it with a simple Node script into index.html like this:
const nunjucks = require("nunjucks"); const fs = require("fs"); fs.writeFile("index.html", nunjucks.render("index.njk"), function(err, data) { if (err) console.log(err); console.log("Compiled the Nunjucks, captain."); });
Or process it with something like gulp-nunjucks.
11ty has Nunjucks built-in, along with many of the other mentioned so far. Might be good for you if you're actually building a little site.
Use Ajax
Say you had...
<body> <header></header> Content. <footer></footer> </body>
You could fetch the contents for the header and footer from respective files and dump the contents in.
fetch("./header.html") .then(response => { return response.text() }) .then(data => { document.querySelector("header").innerHTML = data; }); fetch("./footer.html") .then(response => { return response.text() }) .then(data => { document.querySelector("footer").innerHTML = data; });
Speaking of JavaScript... If you're building your site using a JavaScript framework of just about any kind, building through components is kind of the main deal there and breaking parts you want to include in other files should be no problem. Some kind of import Header from "./header.js"; and <Header /> is the territory you'd be in in React land.
Use iframes
You could do this:
<body> <iframe src="./header.html"></iframe> Content. <iframe src="./footer.html"></iframe> </body>
But the content in those iframes does not share the same DOM, so it's a bit weird, not to mention slow and awkward to style (since iframes don't know the heights of their contents).
Scott Jehl documented a cool idea though: You can have the iframe inject the content of itself onto the parent page then remove itself.
<body> <iframe src="header.html" onload="this.before((this.contentDocument.body||this.contentDocument).children[0]);this.remove()"></iframe> Content. <iframe src="footer.html" onload="this.before((this.contentDocument.body||this.contentDocument).children[0]);this.remove()"></iframe> </body>
Use Jekyll
Jekyll is a Ruby-based static site generator with includes. You keep your includes in the /_includes/ folder, then:
<body> Liquid error: This liquid context does not allow includes. Content. Liquid error: This liquid context does not allow includes. </body>
Jekyll is a big one, so I'm calling it out here, but there are a ton of static site generators and I'd wager any of them can do includes.
Use Sergey
OK, I'll call out one more SSG because it's new and super focused. Sergey has a web components style format:
<body> <sergey-import src="header" /> Content. <sergey-import src="footer" /> </body>
You'd name the files header.html and footer.html and put them in /includes/ and then it'll make a build with the includes processed when you run the npm script it has you do.
Use Apache SSI
Apache, a super duper common web server, can do includes. You do it like this:
<body> <!--#include file="./header.html" --> Content <!--#include file="./footer.html" --> </body>
But you need the right Apache configuration to allow stuff. I tried my best to get a working demo going but didn't have much luck.
I tried using .htaccess within a folder on an Apache server and flipping on what I thought was the right stuff:
Options +Includes AddType text/html .html AddOutputFilter INCLUDES .html
I'm sure there is some way to get it working though, and if you do, it's kinda neat that it needs zero other dependencies.
Use CodeKit
Mac only, but CodeKit has a special language called Kit it processes where 90% of the point of it is HTML includes. It uses special HTML comments:
... <body> <!-- @import "./header.html" --> Content <!-- @import "./footer.html" --> </body> ...
Use Dreamweaver
Lol jk. But it really is a thing. DWTs, baby.
Holy Crap
That's a lot of ways, isn't it?
Like I said at the top, it's very surprising to me that HTML itself hasn't addressed this directly. Not that I think it would be a great idea for performance to have <include> statements that trigger network requests all over our code, but it seems in-line with the platform. Using ES6 imports directly without bundling isn't a great idea always either, but we have them. @importing CSS within CSS isn't a great idea always, but we have it. If the platform had a native syntax, perhaps other tooling would key off that, much like JavaScript bundlers support the ES6 import format.
The post The Simplest Ways to Handle HTML Includes appeared first on CSS-Tricks.
The Simplest Ways to Handle HTML Includes published first on https://deskbysnafu.tumblr.com/
0 notes